
WS2012 Storage - Creating a Storage Pool and a Storage Space (aka Virtual Disk) using PowerShell
_using_PowerShell/Top-10-Cloud-Storage-Services-in-2013__1913321047__-256x256.png) In my previous posts I talked about how to use NFS and iSCSI technologies hosted on Windows Server 2012 and how to deploy those to my Home Lab ESXi servers.
In my previous posts I talked about how to use NFS and iSCSI technologies hosted on Windows Server 2012 and how to deploy those to my Home Lab ESXi servers.
-
WS2012 Storage - iSCSI Target Server - Create an iSCSI target using PowerShell
-
WS2012 Storage - iSCSI Target Server - Configuring an iSCSI Initiator on VMware vSphere 5.1
-
WS2012 Storage - NFS Server - Configure NFS for VMware vSphere 5.1
One point I did not covered was: How to do the Initial setup with the physical disk, Storage pooling and the creating the Virtual Disk(s) ?
The cost to acquire and manage highly available and reliable storage can represent a significant part of the IT budget. Windows Server 2012 addresses this issue by delivering a sophisticated virtualized storage feature called Storage Spaces as part of the WS2012 Storage platform. This provides an alternative option for companies that require advanced storage capabilities at lower price point.
Overview
-
Terminology
-
Storage Virtualization Concept
-
Deployment Model of a Storage Space
-
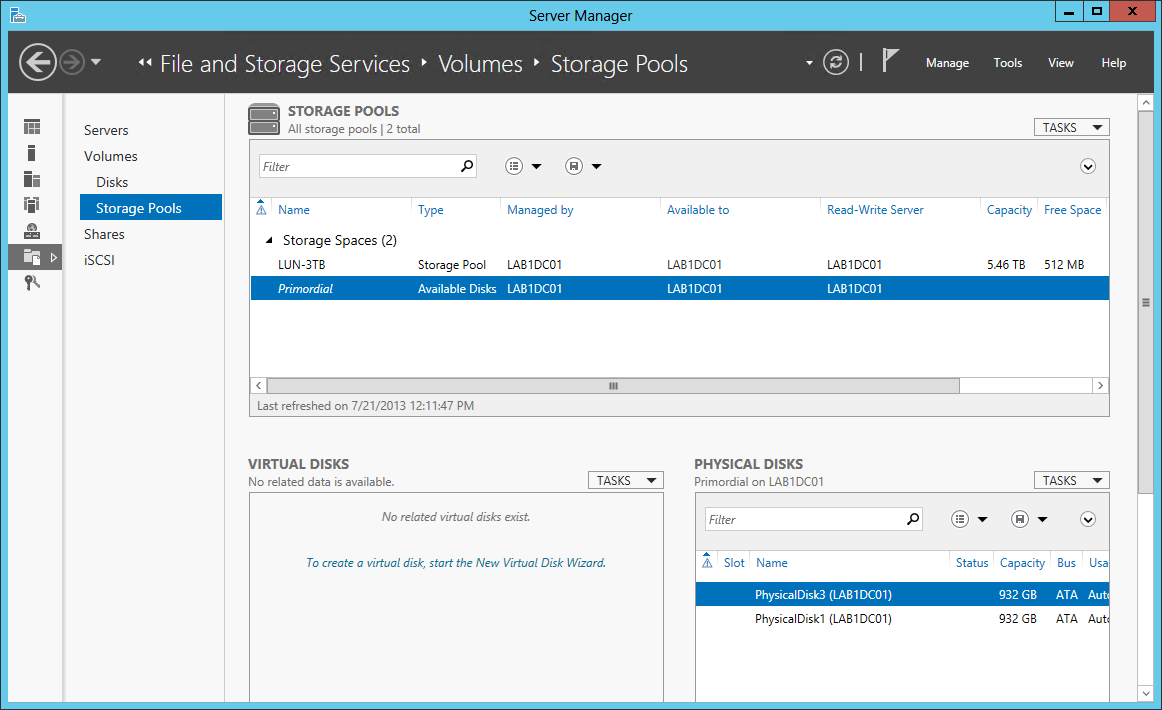
Quick look at Storage Management under Windows Server 2012
-
Server Manager - Volumes
-
PowerShell - Module Storage
-
Identifying the physical disk(s)
-
Creating the Storage Pool
-
Creating the Virtual Disk
-
Initializing the Virtual Disk
-
Partitioning and Formating
Terminology
Storage Pool:Abstraction of multiple physical disks into a logical construct with specified capacity Group of physical disks into a container, the so-called storage pool, such that the total capacity collectively presented by those associated physical disks can appear and become manageable as a single and seemingly continuous space.
There are two primary types of pools which are used in conjunction with Storage Spaces, as well as the management API in Windows Server 2012: Primordial Pool and Concrete Pool.
Primordial Pool:The Primordial pool represents all of the disks that Storage Spaces is able to enumerate, regardless of whether they are currently being used for a concrete pool. Physical Disks in the Primordial pool have a property named CanPool equal to “True” when they meet the requirements to create a concrete pool.
Concrete Pool:A Concrete pool is a specific collection of Physical Disks that was formed by the user to allow creating Storage Spaces (aka Virtual Disks).
Storage Space:Virtual disks with associated attibutes that include a desired level of resiliency, thin of fixed provisioning, automatic or controlled allocation on diverse storage media, and precise administrative control.
Storage Virtualization Concept
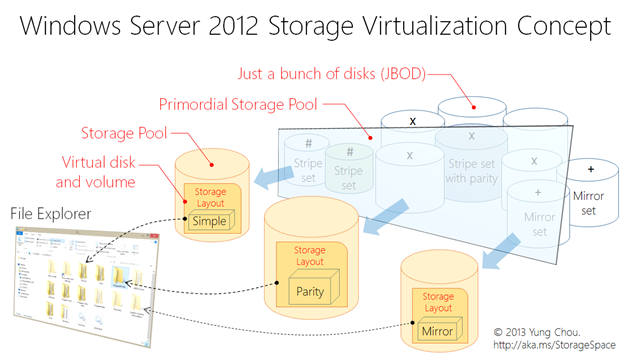.png) ### Deployment Model of a Storage Space (Virtual Disk)
In order to understand the deployment model of a Storage Space, I created the following diagram. Hopefully helpful!
### Deployment Model of a Storage Space (Virtual Disk)
In order to understand the deployment model of a Storage Space, I created the following diagram. Hopefully helpful!
_using_PowerShell/WS2012_Storage_Workflow__1252811681__-1125x1600.png) ###
###  Using PowerShell - Module Storage
Microsoft Windows Server 2012 is delivered with a really awesome PowerShell Storage module.
Use the Cmdlet Get-Command to retrieve the full list of Cmdlets available in this module.
```
Get-Command -Module Storage | Select-Object Name
```
Note: You need to import the Storage module in order to be able those. If it's not the case, juste use Import-Module.
```
Import-Module Storage
```
Using PowerShell - Module Storage
Microsoft Windows Server 2012 is delivered with a really awesome PowerShell Storage module.
Use the Cmdlet Get-Command to retrieve the full list of Cmdlets available in this module.
```
Get-Command -Module Storage | Select-Object Name
```
Note: You need to import the Storage module in order to be able those. If it's not the case, juste use Import-Module.
```
Import-Module Storage
```
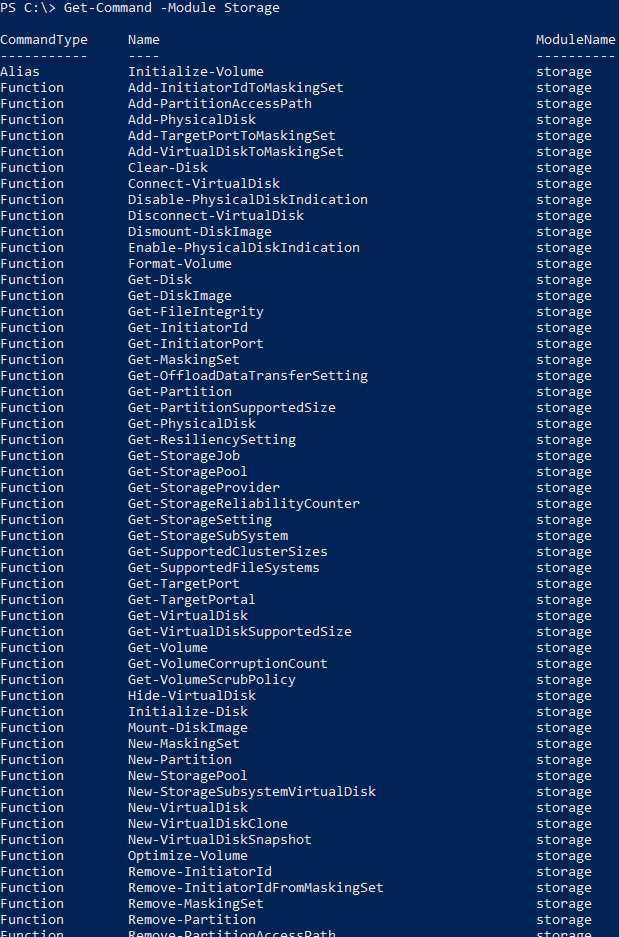 Here is the full list of Cmdlets for the Storage Module.
```
Get-Command -Module Storage | Select-Object Name
```
Here is the full list of Cmdlets for the Storage Module.
```
Get-Command -Module Storage | Select-Object Name
```
Name
----
Initialize-Volume
Add-InitiatorIdToMaskingSet
Add-PartitionAccessPath
Add-PhysicalDisk
Add-TargetPortToMaskingSet
Add-VirtualDiskToMaskingSet
Clear-Disk
Connect-VirtualDisk
Disable-PhysicalDiskIndication
Disconnect-VirtualDisk
Dismount-DiskImage
Enable-PhysicalDiskIndication
Format-Volume
Get-Disk
Get-DiskImage
Get-FileIntegrity
Get-InitiatorId
Get-InitiatorPort
Get-MaskingSet
Get-OffloadDataTransferSetting
Get-Partition
Get-PartitionSupportedSize
Get-PhysicalDisk
Get-ResiliencySetting
Get-StorageJob
Get-StoragePool
Get-StorageProvider
Get-StorageReliabilityCounter
Get-StorageSetting
Get-StorageSubSystem
Get-SupportedClusterSizes
Get-SupportedFileSystems
Get-TargetPort
Get-TargetPortal
Get-VirtualDisk
Get-VirtualDiskSupportedSize
Get-Volume
Get-VolumeCorruptionCount
Get-VolumeScrubPolicy
Hide-VirtualDisk
Initialize-Disk
Mount-DiskImage
New-MaskingSet
New-Partition
New-StoragePool
New-StorageSubsystemVirtualDisk
New-VirtualDisk
New-VirtualDiskClone
New-VirtualDiskSnapshot
Optimize-Volume
Remove-InitiatorId
Remove-InitiatorIdFromMaskingSet
Remove-MaskingSet
Remove-Partition
Remove-PartitionAccessPath
Remove-PhysicalDisk
Remove-StoragePool
Remove-TargetPortFromMaskingSet
Remove-VirtualDisk
Remove-VirtualDiskFromMaskingSet
Rename-MaskingSet
Repair-FileIntegrity
Repair-VirtualDisk
Repair-Volume
Reset-PhysicalDisk
Reset-StorageReliabilityCounter
Resize-Partition
Resize-VirtualDisk
Set-Disk
Set-FileIntegrity
Set-InitiatorPort
Set-Partition
Set-PhysicalDisk
Set-ResiliencySetting
Set-StoragePool
Set-StorageSetting
Set-StorageSubSystem
Set-VirtualDisk
Set-Volume
Set-VolumeScrubPolicy
Show-VirtualDisk
Update-Disk
Update-HostStorageCache
Update-StorageProviderCache
```
### Identifying the physical disk(s)
The first thing we will need is to identify which physical disk I will be using for my Storage Pool(s).
_using_PowerShell/Drawing2__2105661421__-332x140.png) In the example below, I'm using the Get-PhysicalDisk cmdlet to list all of the Physical Disks that are present on the system:
```
Get-PhysicalDisk -CanPool $true
```
In the example below, I'm using the Get-PhysicalDisk cmdlet to list all of the Physical Disks that are present on the system:
```
Get-PhysicalDisk -CanPool $true
```
 ### Creating the Storage Pool
In the example below I use New-StoragePool Cmdlet to show the creation of a Storage Pool named "LUN-1TB", using all of the Physical Disks which are currently available for pooling.
### Creating the Storage Pool
In the example below I use New-StoragePool Cmdlet to show the creation of a Storage Pool named "LUN-1TB", using all of the Physical Disks which are currently available for pooling.
_using_PowerShell/Drawing2_2__212364170__-332x140.png) ```
New-StoragePool -FriendlyName "LUN-1TB" `
-StorageSubSystemUniqueId (Get-StorageSubSystem -FriendlyName "*Space*").uniqueID `
-PhysicalDisks (Get-PhysicalDisk -CanPool $true)
```
```
New-StoragePool -FriendlyName "LUN-1TB" `
-StorageSubSystemUniqueId (Get-StorageSubSystem -FriendlyName "*Space*").uniqueID `
-PhysicalDisks (Get-PhysicalDisk -CanPool $true)
```
 ### Creating the Virtual Disk (aka LUN/Storage Space)
A Storage Space is created from an existing Storage pool. The Storage Space (also known as a Virtual Disk) is also exposed as a Windows disk, visible in Windows applications. Additionally, Storage Spaces may be configured in a variety of methods to provide either increased performance or resilient configurations (or combinations of both).
Creating a Storage Space requires the following information:
* The Name, UniqueID or FriendlyName</b>of the Storage Pool that was created, here "LUN-1TB"
* A FriendlyName</b> to use for the Storage Space to create
* The Size</b> of the Storage Space to create (you can also use the -UseMaximumSize parameter)
* (Optionally) Use of advanced settings when creating the Storage Space, such as
* Number of Physical Disks to use for a specific Storage Space,
* Utilizing specific resiliency setting
* Provisioning Type.
For more information on using advanced settings for the creation of a Storage Space, please refer to the New-VirtualDisk help using Get-Help or on the TechNet page online.
The following example shows the creation of a Storage Space that is 200GB in size, named "DataStore01", using the pool named "LUN-1TB"
```
New-VirtualDisk -FriendlyName "Datastore01" `
-StoragePoolFriendlyName "LUN-1TB" -Size 200GB `
-ProvisioningType Thin -ResiliencySettingName Mirror
```
### Creating the Virtual Disk (aka LUN/Storage Space)
A Storage Space is created from an existing Storage pool. The Storage Space (also known as a Virtual Disk) is also exposed as a Windows disk, visible in Windows applications. Additionally, Storage Spaces may be configured in a variety of methods to provide either increased performance or resilient configurations (or combinations of both).
Creating a Storage Space requires the following information:
* The Name, UniqueID or FriendlyName</b>of the Storage Pool that was created, here "LUN-1TB"
* A FriendlyName</b> to use for the Storage Space to create
* The Size</b> of the Storage Space to create (you can also use the -UseMaximumSize parameter)
* (Optionally) Use of advanced settings when creating the Storage Space, such as
* Number of Physical Disks to use for a specific Storage Space,
* Utilizing specific resiliency setting
* Provisioning Type.
For more information on using advanced settings for the creation of a Storage Space, please refer to the New-VirtualDisk help using Get-Help or on the TechNet page online.
The following example shows the creation of a Storage Space that is 200GB in size, named "DataStore01", using the pool named "LUN-1TB"
```
New-VirtualDisk -FriendlyName "Datastore01" `
-StoragePoolFriendlyName "LUN-1TB" -Size 200GB `
-ProvisioningType Thin -ResiliencySettingName Mirror
```
 Another example using -UseMaximumSize
New-VirtualDisk -FriendlyName "Datastore01" `-StoragePoolFriendlyName "LUN-1TB" -UseMaximumSize `-ProvisioningType Thin -ResiliencySettingName Mirror
Another example using -UseMaximumSize
New-VirtualDisk -FriendlyName "Datastore01" `-StoragePoolFriendlyName "LUN-1TB" -UseMaximumSize `-ProvisioningType Thin -ResiliencySettingName Mirror
 ### Initializing the Virtual Disk
### Now the Storage Space (Virtual Disk) is created, we need to locate the disk that corresponds with the Storage Space named "DataStore01" and initialize it:
### Locating the disk, this can be done by Get-VirtualDisk and Get-Disk cmdlets as shown below:
```
Get-VirtualDisk -FriendlyName "Datastore01" | Get-Disk
```
###
### Initializing the Virtual Disk
### Now the Storage Space (Virtual Disk) is created, we need to locate the disk that corresponds with the Storage Space named "DataStore01" and initialize it:
### Locating the disk, this can be done by Get-VirtualDisk and Get-Disk cmdlets as shown below:
```
Get-VirtualDisk -FriendlyName "Datastore01" | Get-Disk
```
###
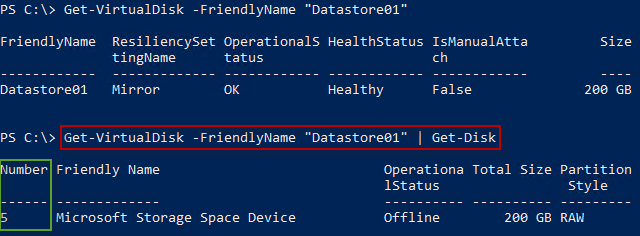
As you can see my virtual disk has the Number 5
The next step is to use the Initialize-Disk cmdlet to initialize the disk:
In the preceding example, we determined that the disk we need to initialize is disk number 5, so I would use the Initialize-Disk cmdlet as shown below:
 ### Partitioningand Formating
Now that disk 5 is initialized, the next step is to create a partition on the Storage Space, which can be done via the New-Partition cmdlet.
```
New-Partition -DiskNumber 5 -UseMaximumSize -AssignDriveLetter
```
```
```
To create a volume on the Storage Space, I will now format the volume associated with DriveLetter D which was assigned in the previous step.
```
Format-Volume -DriveLetter D -FileSystem NTFS -NewFileSystemLabel "DataStore01"
```
### Partitioningand Formating
Now that disk 5 is initialized, the next step is to create a partition on the Storage Space, which can be done via the New-Partition cmdlet.
```
New-Partition -DiskNumber 5 -UseMaximumSize -AssignDriveLetter
```
```
```
To create a volume on the Storage Space, I will now format the volume associated with DriveLetter D which was assigned in the previous step.
```
Format-Volume -DriveLetter D -FileSystem NTFS -NewFileSystemLabel "DataStore01"
```
 And you done...
Where to go from here ? Check out my previous storage posts:
* WS2012 Storage - iSCSI Target Server - Create an iSCSI target using PowerShell
* WS2012 Storage - iSCSI Target Server - Configuring an iSCSI Initiator on VMware vSphere 5.1
* WS2012 Storage - NFS Server - Configure NFS for VMware vSphere 5.1
Resources
Download - Windows Server 2012
Download - Windows Server 2012 R2 PreviewTechNet - Windows Server 2012 Storage Virtualization ExplainedDownload - Windows Server 2012 White Paper Storage.pdf
MSDN - An Introduction to Storage Management in Windows Server 2012
Download - Deploy and Manage Storage Spaces with PowerShell.docx
TechRepublic - DIY SAN: Windows Server 2012 Storage Spaces and iSCSI target
TechNet - Windows Server 2012 Test Lab Guides
And you done...
Where to go from here ? Check out my previous storage posts:
* WS2012 Storage - iSCSI Target Server - Create an iSCSI target using PowerShell
* WS2012 Storage - iSCSI Target Server - Configuring an iSCSI Initiator on VMware vSphere 5.1
* WS2012 Storage - NFS Server - Configure NFS for VMware vSphere 5.1
Resources
Download - Windows Server 2012
Download - Windows Server 2012 R2 PreviewTechNet - Windows Server 2012 Storage Virtualization ExplainedDownload - Windows Server 2012 White Paper Storage.pdf
MSDN - An Introduction to Storage Management in Windows Server 2012
Download - Deploy and Manage Storage Spaces with PowerShell.docx
TechRepublic - DIY SAN: Windows Server 2012 Storage Spaces and iSCSI target
TechNet - Windows Server 2012 Test Lab Guides
Leave a comment